Tuesday 24 December 2013

Collage Place settings/Tree ornaments


Hey everyone! In between minding the stove, wrapping final gifts and generally lending a hand for the festivities I’ve got just enough time to slam out one final festive post!
I made these cute ornaments two days ago, all designed as wrapped packages decorated with various leftover embellishments from other projects. They’re easy to make, just measuring out 6cm by 8cm squares of cardboard that you can layer with anything from ribbons to rhinestones. I wanted each to be individual, but even if I had to double up on felt base shades. It was super fun using different materials and tones, and even playing with contrasting colors like pink and green! They can either be place settings for the table, or even tree ornaments for the whole family if you attach a loop of ribbon on a corner to it to hang on.


Well, I hear my name being called to assist with stuffing. Happy Holidays, everyone! 


Sunday 22 December 2013

Gingerbread House Building


A long standing tradition in my household for the holiday season, passed down from my grandfather, who was a baker, to my Dad is Gingerbread houses, or Peppakakor as we say in Swedish. And not those candy covered creations that, though adorable, never have the same authenticity to them. We create not just a gingerbread structure, but a whole display with figurines, trees and cotton wool for snow.
I recall many Christmases where Dad spent hours drafting and baking his model, which turned out to be an exact replica of our home in Sweden! As a growing crafter, Dad eventually passed the mantle to me. At first my creations were simple-a barn for a nativity scene etc. But then I got the buzz and since then am determined every year to produce something original and exciting, like my popular Polar Express and ship. Drawing on my theatrical background I want a structure that creates an entire winter wonderland scene around. Check out my gingerbread portfolio!


This year, determined to go that extra mile and make something really new, I’ve decided to play with levels and height, shaping a more vertical landscape. I considered castles and two famous ones came to mind; first, the castle of the Taunting Frenchmen in Monty Python and the Holy Grail and Hogwarts. 
The spacing, the levels, the variation in landscape...yep, one of my best!


Saturday 21 December 2013

Alternative Wrapping


Two years ago my idea of gift presentation was changed forever after reading an article on alternative gift wrapping in the Sunday Times Style magazine. I know we all love our beautiful packages tied up with strings, but honestly to think that we spend tons on t I know, I geek out a lot about going green, but seriously, in the smallest ways anything can make a difference. Therefor I’m doing a whole post on magazine page gift wrapping.
Last Christmas I wrapped all my gifts in perfume and watch ads, topped with ribbons in complimenting tones to the color scheme of the page. It was fun, refreshing, and didn’t cost a penny. 


This year I wanted to have a more unified theme to my gifts-you know, how someone uses the same wrapping paper so you know it’s from them! At first I thought of using festive ads, saving pages like the Jo Malone christmas ad and Cartier (that leopard cub is adorable!!) But when the How To Spend It seasonal editorial spread came out, it was perfect. The red and black color scheme was a refreshing contrast to the festive shades, and the pages were large enough in size and quantity. Because there weren’t enough pages to wrap all my presents, I divided them into sections for my family and friends, identified by which pages I used.


Now, magazine pages can be thin, and tear easily on sharp edged gifts in boxes and so on, so I recommend holding onto some sheets of tissue paper (I save all the ones from shopping) to wrap the gift in first as a precaution. However the covers of magazines are printed are sturdier paper and way more durable.


Second, I recommend measuring your gifts to their allocated pages first (larger gifts to double page spreads etc.) to avoid panic when some gifts are left bare after your paper stash is gone.
Finally give your gift it a decorative flare at the end with a complimenting colored bow that compliments a detail on the page (the color of the model’s lipstick etc), for a more artistic and even professional touch. 
I guarantee that your efforts to greenify your Christmas will be noted and much praised compared to the store-wrapped corporate clones under the tree. 


Wednesday 18 December 2013

December Book Review: Tattered Layered and Stitched; A Fabric Art Workshop by Ruth Rae


This book is a gem for anyone who, like me, just can’t seem to throw out even the smallest remnant of fabric in hopes of it contributing to something amazing. Here Rae really celebrates the possibility of texture that fabric offers in collage art. This title I wished to review for the Christmas season in particular because it’s triggered several different crafting projects for the holiday season, from Tree ornaments to place settings.
I had a motto for a while as a craft-add, don’t subtract. The more different materials you pack on and manage to bend together on one blank slate, the better! It was the reason one summer I got really into making these mixed media collages, consisting of a watercolor character I’d painted, on a colored paper base and embellished with different things from magazine clippings to nail varnish strokes. Here, Rae has a similar approach to fabric crafting, but not merely for art, like her beautiful Wall Tree Art, but also ideas for gifts. Some projects are easier, like her scraps card, while others like her Ancestry album call for more time and call.
Her biggest strength is in the treatment of the fabric. For one, I loved her technique of machine stitching uneven stitches in non-matching thread onto the fabric. It’s got a real homemade quality to it, but in this case, it works! However I’m nervous about attempting her technique of sewing paper and fabric together-I’m terrified of screwing up my beloved machine. 
None the less, I recommend this title if you nuts about fabric and upcycling and wanna make something authentic and cool to touch, and are willing to go that extra mile to expand your creative horizons, go for it! For example, I’m thinking of making an alt-fabric scrap book for my sister’s wedding next summer with some of Rae’s suggestions. And, if I have any time, will be stitching up some cool ornaments to hang on my tree next week. 

Final Score: 4/5

Thursday 12 December 2013

There's a Blizzard in my Bathroom!


Since I heard her interview on Craftypod, I’ve been intrigued by the idea of recycled materials always providing materials for all your crafting needs. Michelle Pacey’s blog Michelle Made Me offers some amazing projects that won’t cost a penny. I’ve been getting great ideas for the holiday season, especially with her twig wreath and her junk mail ‘Blizzard’ for the holiday season. This time of year people tend to go a little consumer crazy, and it’s refreshing to see simple, homemade ways to celebrate the holidays.
Like, for instance, that project I’m sure you did in Kindergarten, yet never gets old, paper snowflakes. Drawing some Michelle’s junkmail Blizzard, inspired by the idea of how easily this craft supple is constantly being replenished, especially this time of the year when your mail boxes are probably overflowing with pamphlets and such. 
For this project, I chose my bathroom window as a locale to set the end results up-a window free of any blinds or curtains is ideal and a perfect blank slate. Instead of a mash up of colors, for this cleansing setting I thought of choosing a soothly color tone as a theme. What I’ve been noticing that makes certain holiday decorations stir clear of being festively ‘dull’ is the use of non traditional colors. Instead of your typical greens and reds, use blue, oranges, pinks etc! So I took perfume ads and such that all share a blue tone.


An fun, cheap and easy project that makes your home festive for the holidays and enjoyable for all ages. Another nice touch I considered was painting the outer edges of the snowflakes with glittery nail polish to give it a colourful 'frosted' look. A top coat type varnish would be better, like Essie's new glittery top coat collection so you won't pick up the brush strokes. 


Wednesday 20 November 2013

Cookies N' Cream Earrings


As well as my Ben n’ Jerry’s guilty pleasure, cream and chocolate brown are some of my favorite color palettes. It’s warm, soft and very chic. Another project inspired by Tarantino’s Sparkle Factory, I loved the use of buttons and beads together. True, I had to purchase the buttons to get the exact shape and shade I wanted, but any excuse to expand my button collection is great! Tarantino is right-buttons do have a lovely shine, and when crafting with them one can’t help but be cheerful, remembering those first sewing projects.
My wirework could use a little work-the whole shape of the earring is a little lopsided not quite as chandelier like as Tarantino’s. But for my first earrings, I’d say they’re deliciously pretty!

Sunday 17 November 2013

Mould Making Phase 2


It’s official-I may been becoming a bit of a Premo-clay fiend! After how easy these moulds were to make, I’ve got the bug!
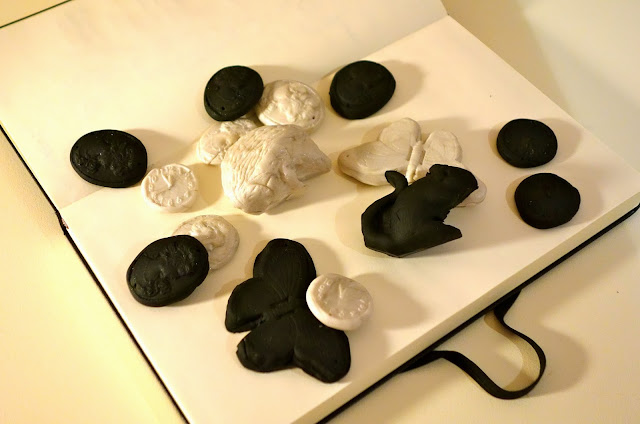
It’s amazing to think I made this many moulds out of two small packets of Premo. Though I’m more drawn to the matt shade of the black clay and was annoyed when some of the sparkles from the pearl clay were left on the moulds. The cameo was by far my favorite, since the clay picked up the details beautifully.
And some of the moulds didn’t work out. For example the mouse had too many details to be picked up on a 2D mould. But I still gave the hedgehog a shot, which I plan to make into a broach. Not sure yet what I’ll use the butterflies for, but the clock faces will be amazing for some themed necklaces, like Cinderella and Alice in Wonderland. 
Premo clay itself was super simple and fun to work with as well. True you gotta condition it for a while for max flexibility, but it makes me wanna experiment with different meshing techniques I’ve read about. If you haven’t experimented with this wonderful material yet, I urge you to do so.

Project Budget: £6 (for mould clay and 2 Premo packets)

Saturday 9 November 2013

November Book Review: Debbie Stoller 'Stitch N' Bitch'


Seriously, this is the Magna Carta of the knitting world. When my sister gave me this for Christmas years ago, it was the beginning of a beautiful friendship. Here, Debbie Stoller unleashed the Stitch N’ Bitch culture, reincarnating knitting into a fun and funky past time for us crafters today.
Learner’s steps, tips and patterns, and even some handy ideas for putting together a knitting bee of your own, this title is an essential for all ‘chicks with sticks’. The layout is fresh and innovating, the pictures inspiring, and does a great job in kick starting the knitting buzz that’s arisen in the last ten years. No matter what level you’re at, there will always be a time when you need to refer back to this book. Over the years I’ve constantly returned to it, and probably done about 50% of the projects in my knitting career; including ‘To Dye For’ sweater and the Chinese Charm bag. Some of the projects are more challenging, like the Pinup Queen sweater, while others seem a bit boring, but none the less remain the tried-and-true of knitting, like the ever adorable Techno-Cozy cover.  
Fun and funky, if you’re a newb at knitting, look no further than this title to get you started. If you're a devoted knitter, get this book. It won't be long before the contents become dog eared, believe me.

Final Score: 5/5

Thursday 31 October 2013

Halloween Town sign


A tradition I’ve started is having a Tim Burton marathon at the start of ever October. And one of my favorite shots from The Nightmare Before Christmas is the close up of the Halloween Town sign, with the pumpkin head scare crow swinging in the wind. This gave me an idea for my annual Halloween Table display-the one part of my house I’m allowed to go nuts with for the holiday season!


I remembered a yarn doll design from one of the American Girl craft books that I made years ago, and decided to resurrect it for this project. It’s very easy; take get a large piece of cardboard about the entire length that you want your doll and wind the yarn around it until. Cut the yarn from one end to detach it from the cardboard, secure the folded centre with a strand of yarn, then about 2 or more inches down tie and knot about strand to make the head. Section off the arms, cutting the extra yarn to a shorter length and tying more yarn around to shape the hands. Then secure the torso, and do the same for the legs. You now have your scarecrow! Dress him as your please-I used some old pieces from my doll projects.
Now download some good pictures off the net of hardwood floors-the more detailing in the wood, the better! Print it, then cut and paste to pieces of cardboard to make the beams of the post. Have a crossbeam for the arms of the scarecrow to hang from, slightly off centre for a real creepy rustic look. 
Now add the direction signs. I chose scary towns in the States, such as Sleepy Hollow and Savannah, but you can do anything, from your home town to Warning signs if you like! 

Tuesday 22 October 2013

Customised Treasure Box


Several years ago for my birthday, my elder sister Marika gave me a small wooden box, a perfect blank slate to design to my heart’s content. For ages it sat among my jewelry collection, awaiting the dawn of it’s redesign. Like most crafters, I was terrified at the idea of wasting the opportunity. The simplest mistake could take this box from beautifully redone to tacky!
Finally, after reading Mark Montano’s Big As Book of Crafts 2, the perfect treatment came to me. With some old magazines pages, spray primer and bronze paint, this box was transformed into a antique like container! From a distance the texture and color has a gorgeous antique detail. I’ve used this box many times for my doll photography, like my Pirates collection. And what was most fun was how easily you can lay out the rolled up tubes of paper in any direction, curving easily around the outline of the container.
Simple with amazing results, this customization technique isn’t just limited to specific containers either. If you’re like me and save every single little boxes you get at Christmas (I have them all sitting in a shoebox at home!) this would be a great method to spruce one up, making it special enough to store your precious treasures in. For more delicate keepsakes like jewelry, I suggest lining the inside of the boxes with felt. Also be sure to shave off the excess edges of the paper tubes-the smallest bit of unrolled paper stick out on the final piece.


Sunday 13 October 2013

Button Cluster Collection


So I wore my button cluster necklace last night to a dinner, and my friend Valentina loved it. She has amazing taste, from her signature pink plaster heart shaped ring to her strapless Spongebob Squarepants dress! So I was really flattered when she asked if I make earrings. To be honest, I haven’t really considered making any earrings yet. My signature bob haircut has little call for earrings, the reason I stick to bold neck pieces instead for my jewelry crafting. Val none the less requested if I ever made something again to do a little something for her with the leftovers.
On the tube home, I had a moment of inspiration for ways to continue the button cluster theme, but putting them into earrings, and even a cool cocktail ring! I have all the materials, so why not just see?
I drafted three bases out of black sugar paper-a small circle for the ring, ovals for the earrings. The ring was easy, the tiny scale caller for smaller buttons and sequins to still maintain that cluster effect. The earrings, however, I had to put the cluster on both sides of the base since the pieces would hang and be seen from all sides. Also once attached to the earring loops, they became far too heavy. Next time I’ll try a smaller base, and consider less cluster detail. 
So did I waste my time creating those pieces? Heck no! I’ve turned one piece into a keychain, and have the other on reserve for a necklace centre piece. But I did learn that when excited about a new project, I should probably be sure before investing too much time into its creation that it’ll work.  


Project Budget: None-leftovers from previous project!

Wednesday 9 October 2013

Chunky Pearl and Pins Necklace


A project found in my absolute favorite craft book, Tarina Tarantino’s ‘The Sparkle Factory’, this necklace was been my second attempt at jewelry making. Right away I was struck by the boldness of the shape of the beads, and keen to try some techniques such as making a proper head pin and crimping.


Tarantino’s original necklace, entitled the ‘Techno Tribal Pin Collar’ as the name suggests was a little too wacky for me, with its acid neon beads. But I loved the outline and collaboration of large pearl beads and chain, so I set out to make it in my own vision, with a more vintage tone. So far my personal style has sky rocketed simply from being more adventurous in my accessories. 
Originally I wanted to make this necklace with gold chain and safety pins, but it looks like there aren’t any gold pins in large sizes on the market. Besides, in the end the silver toned chain with the different sized white pearls looked more street style without being too granny-ish. 
I substituted the wire that threads the beadwork and pins together with jewelry making jelly cord. The wire I got couldn’t even fit through the smaller beads. It was great to practice some crimping, but I am petrified of the cord snapping due to the weight of the beads one of these days. Also on the end of the chain, I added Tarantino’s bead detail. This really gives it a very professional touch!


With pride I wore the finished piece to work this week, with burgundy colored jeans and one of my favorite oversized jumpers. The necklace caught everyone’s eyes! I can see this being a brilliant statement piece. Also I’d love to try making another in a more versatile tone, like gold, if I could just find a good supplier that stocks these materials. It was fun to make, and has a funky-feminine feel to it. 

Project Budget: £25 (includes various size beads, chain, cord, safety pins and head pin)


Sunday 6 October 2013

October Book Review: The Unofficial Harry Potter Party Guide by Jessica Fox


In the spirit of the season of Halloween, I thought this title would be appropriate. However, I should highlight that when I downloaded a sample onto my Kindle, it had been taken from the crafting section of the book. Yes, I should have reread the book’s name, but I grew up in a household of hardcore Potter fans, can you blame me?


Granted, the author offers some amazing tips on how to throw the ultimate Harry Potter themed party. I don’t have kids myself, but I can see these ideas instantly piloting one’s rep as an awesome parent. From making potion drinks to party games, such as using large packing boxes to make a maze for your own Triwizard Tournament to how to have your own sorting ceremony, this book considers every aspect of this experience-and all more simple that you’d think.
The author does have in the beginning a section filled with some sweet items that you’d recognize from the books that would be brilliant to bring to life with any Potter fan. But I guess I was rather hoping for more. After visiting the Warner Bros Studios last year, I never realized all the incredible richness all the props hold! So while this book does give details on how to make a pair of Luna Lovegood’s radish earrings, I could think of projects that would be more appealing, like making your own Owl or Slytherin’s locket-though I’m really tempted to make my own Pygmy Puff! 

Now that I think about it, there’s a book idea here,folks-Potter Crafts, an entire volume on making your own Harry Potter themed items.

The instructions are clear, though I find the budget the author’s gives for each project to be a little underestimated. Also I wondered why, when inspired by book as rich in visual details as Harry Potter, you’d opt to do the photos for this title in black and white? So maybe not a volume that’s vital to a crafter’s library, but a damn good read for ideas for your kids’ birthday party.

Final Score: 1/5

Saturday 28 September 2013

Exhibit Review: V&A 'Club to Catwalk'


No place in all of London gives me such inspiration as the V&A. Every time I experience ‘Creative Block’ (Writers Block for Designers), all I gotta go is head over there. But first I have to make a personal protest. In the more popular exhibitions these days, now not only is photography prohibited, but now so is sketching! Usually I attend exhibitions more than once because I like to come back and look again in more details and things that stood out for me. Last year when I first came to the Ballgowns exhibitions at the V&A, the place was filled with fashion students at work-it was such a rich source for inspiration! But then when I came back, with a tiny notebook and pen, one of the ushers told me sketching was prohibited. I was outraged-first, how can they change their policy half way through an exhibition? Second, the V&A is visited by thousands of fashion students a year! It seems so wrong to actually try to dissuade them from drawing inspiration from their presentations. I’m just dumbfounded by this policy, and would love to understand their reasoning behind it.
The Club to Catwalk exhibit currently on is a presentation of the nightlife scene influenced fashion. It features works from designers including John Galliano and Vivienne Westwood who really embraced the outbreak of Punk style of the 1980’s. But it also discussed how fashion morphed into personal expression, in customizing clothes to becoming part of trends such as Goth as a reaction to political movements. 
Overall, I was a little disappointed in the exhibition. To me, the tone was very much a repeat of their Brit Pop exhibit  that opened in 2011, of how nightlife and music influenced fashion movements of the decade. 


However, I was exposed to some designers I’d never heard of, such as the Mortisha brand that picked up on the Goth movement, creating pieces such as coffin shaped clutches. A mask shaped brooch caught my eye, giving me an idea for a mould and a way of expressing my love for the performing arts. The Swanky Modes black stretch dress was fabulous-simply chic, yet so seductive with its use of cut and draping. This brand obviously understand the mechanics of fabric. 
Maybe not one of their best presentations yet, but still featuring some really unique pieces. I wish I could remember more but, oh yeah, I wasn’t allowed to sketch....


Wednesday 25 September 2013

Mould Making Part One


Tarina Tarantino awakened this jewelry making craze in me, particularly in mould making. I’ve got so many oddities lying around that would make cute unique pieces in a necklace, brooch etc, from keychains to small figurine animals. And once you have the one mould, you can make these pieces in different colors again and again.
I got an 8oz packet of Sculpey’s Mould Making clay on Amazon. The results were...complicated.
First, I did not realize how sticky the stuff was gonna be! True, it’s gotta pick up all the intricate details on the original piece, but I panicked that conditioning it would wreck it during baking.
My assembly of mould choices consisted of a tiny clock, a butterfly, a cameo, a heeled shoe, and a mouse and hedgehog figurine. Some were easier, others way more challenging for a first time moulder. 


I wouldn’t recommend this product because of the inconsistent instructions. It seems easy to do, but during baking I was totally flabbergasted. First, the instructions say to bake 20 minutes per 1/4 in of thickness-of what? Of width? Of height? Second, they specifically warn against over baking. Out of habit I always add to the recommendations, whether it’s cooking or cutting extra seam allowance. And they certainly didn’t mention how the clay would take on that purple tinge when baked, so I had no idea if I was overdoing it, or should wait for the mould to be a consistent purple tone throughout. And finally, the instructions claim that after baking, the mould should be ‘permanent and flexible’. How the heck is that possible, those descriptions are completely opposite! When I  got the nerve to take out the smaller pieces first, after cooling off the clay did stiffen a little, but the texture was more rubbery that I’d imagined it be. 
The final verdict won’t be clear until I’ve made the polymer clay pieces themselves, but overall I’m disappointed in this product. 

Sunday 22 September 2013

Mark Montano's Button Cluster Necklace


This was my first attempt as a jewelry maker. And for something that was a complete newbie job, I was thrilled with the results! 


Black is a staple in any fashionistas’s wardrobe, so a cool bold black piece seemed a nice to touch to liven up the jeans and T-shirt look. I worn it yesterday to work with a scoop neck blouse, and despite it’s quirkiness really settled in with the look as a whole.

I recommend this project for anyone who loves bold necklaces, but wanted to make some notes from my own experience crafting this. I have zero experience in metal crafting, so for the base of the pendant I actually stuck together layers of black card which still produced a good solid base to work on. Next, Mr. Montano uses mostly shank buttons, removing the plastic look on the back to flatten them down for the cluster. I didn’t wanna go out and buy buttons specifically for this project, seeing how I’ve got a whole tin full of them, sticking to my rule of ‘working with what you had’. For the few shank buttons I did use, though, I actually didn’t remove the loops, finding them useful to glue and press into place between the layers of buttons. And finally, instead of fashioning jump rings from wire to hook the pendant to the chain, I found my own method a great alternative. Dipping into my ‘Sparkles’ tin, I got three large oval black flat back stones and, using the sewing wholes on it’s edge, looped the jump rings through there. I was afraid that during the spray paint part of the process these wholes would be sealed up by running excess paint, but they didn’t. Also just to add variety, I added more gems amongst the buttons.


This necklace seems chunky and cool from a distance, but closer up it’s unconventional and playful. And although I had my own way of doings things, I strongly urge you not to skim parts of the process, especially the gray primer! Also make sure you get Matt black spray paint. Glossy would come out looking cheap.

Project Costs: £15 (for the spray paint, primer and black chain)

Thursday 19 September 2013

Arts Review: V&A's Pearls


My parents often get invited to the special preview nights at the V&A, and sometimes I’m more than happy to go in my Dad’s place to the more fashion geared events. Last night was the premier opening of the V&A’s special exhibition Pearls. Lasting from Sep 21 until 19th Jan next year, this exhibit is a collaboration between the V&A the the Qatar Museums Authority. I was keen to go, seeing how much next accessory creation will be a pearl necklace!
In the the reception hall guests were dawning, in my opinion, rather gaudy yards and yards of pearls. Though I’m sure they were all enthusiastic to dress for the occasion, not to mention those exquisite jewels no doubt had wonderful history to them, a friend of ours remarked how I looked more subtle with my single black Mikimoto. After a glass of bubbly and a brilliant opening speech from the representative for the collection and Boris Johnson, we headed into the exhibition.
As always, the V&A never fails to deliver unconventional presentation. Not only did it showcase some stunning pieces, from religious icons to Elizabeth II’s coronation dress, the exhibition presented the history and production of the pearl industry. The pieces was presented in massive antique wooden boxes, an innovative way to present such intricate historical jewels. And finally it discussed the historical significance of pearls. At first their association with purity being used in icons featuring the Virgin Mary, but later taking on the more mature sophisticated view we have of them today when they began to symbolize fertility-the reason they’re traditionally worn at weddings. 

As a vintage jewelry lover, I’m keen to go back and gather ideas for other pearl featuring accessories for future projects. I’d love to have another look at the pearl necklace that belonged to Marilyn Monroe, not to mention a piece that belonged to the most amazing collector of all time, Elizabeth Taylor.


Saturday 14 September 2013

September Book Review: Mark Montano's 'Big Ass Book of Bling'


This was the very first craft eBook I downloaded for when I was visiting my sister in Charlotte last May, and quickly became the first of many! 

I got hooked to Mark Montano’s work when I received his Big Ass Book of Crafts for my birthday two years ago. Featuring over 50 projects-at least!-the layout of his books are so vibrant yet simple, not to mention the instructions easy to follow. The book is divided into concise sections, based on certain materials or techniques and the various projects they can be used for, such as wood work or glass fusing, so if you decide to invest in those materials you’re sure to get several projects worth out of them. However, some of the methods for these crafts do intimidate me slightly, mainly because I’m scared to make a mess at my parents’ place! But one thing for sure, this particular book triggered my interest in mould making.

My personal style is very versatile and subtle at the moment, and I’d would like my looks to be more quirky and show my creativity. Accessories may just be the ticket. So while I’m sure to be using some of the tips from this book, the projects I intend to make are focused on being personal yet durable, especially if I’ll be investing time and money into their production. We all go through phases of hobbies, crafting being a particular weakness of mine, and nothing is worse than materials you were desperate to buy at the time that are now covered in dust at the bottom of some drawer somewhere. 

On that note, these are some of the pieces I’ve book marked; The I Ain’t Lion and Linked Bead necklaces seem really easy and fun to make, though for the first I’m considering either the small mouse or frog figurines I own. 


Other projects such as the Ice Resin and Lace earrings and the Love Handcuffs bracelet have given me some great ideas for Christmas gifts. 

End thoughts; the range and number of projects the title offers makes it a must for any crafters'


bookshelf.

Final Score: 4/5

Wednesday 11 September 2013

Second Child Style's Second Era


In the words of Droopy Dog....hello all you happy people. Yes, I know, I’ve been pretty terrible in keeping this blog up to date. Second Child Style has taken many different paths in the past, but now it’s time to combine and direct all those into one singular outlet for this crafter!
The mood board concept did have its advantages, but honestly my heart-and hopefully my future career-lies in crafting. Whether it’s my knitting, doll sewing projects, my recent buzz for jewelry making, or even reviewing the brilliant craft books I’ve read recently, I want to share all of that to the rest of the crafting world.
So Second Child will be going back to its roots, presenting recent projects I’ve been working on, but I’ll be sharing more with readers. For one, since receiving my beloved Kindle last christmas, I’ve discovered a great way to keep my creative thirst at bay while traveling; downloading craft eBooks. Vacations are fun, but planning a project to work on upon your return home does makes the bump back to a reality a little softer. And besides, on those 9 hour long flights visiting my sisters in the States, what better way to spend your time on the plane? So every month I’ll be reviewing one of these amazing titles, and maybe even discussing my own experience dabbling with the projects featured in them. Maybe even reviewing some of exhibitions I’ve visited and how they inspired recently, or even just a crafting technique I learned. Overall this blog will be far more rounded and versatile, set to deliver to suit your every crafting need.
So whether you’re a knitter, jewelry maker, doll costume designer, or just looking for a good read or even a rainy day project, I hope this second child can give you a little inspiration for your creative activities.

Thursday 5 September 2013

Weight Loss Booklet


Once again, I find myself house sitting and being home alone. However, I’ve got a real DIY itch today. Reasons for this particular project are three fold; 1) The Notting Hill Carnival is happening this weekend by my neighborhood, I’m house bound anyway 2) It’s pouring rain outside and 3) I need a notebook anyway.


Frustrated with how my constant exercise regime seems to have produced little results in achieving my target weight loss, I realize I need to take a new approach. My usual workout is sorta boring these days, and I probably could keep a little more of an eye on what I eat. A friend recently recommended keeping a journal that marks your progress, from how I worked out that day to what I ate and what my current weight is. But instead of going around the corner to the stationary store and buying a new notebook, I thought why not make it really personal and homemade. That way, I’d truly be diligent in keeping it up to date!
Despite this day and age of touch screens and fast typing, I think millions would agree with me that there’s something very refreshing about putting pen to paper, whether it’s writing in a diary or even making a note. Notebooks can in usual in so many ways, and not just for your grocery list. For you creative types out there, ever gotten an amazing idea for a project while on the move? With this little baby in your bag, you can jot that idea down before it vanishes forever. Also in the fashion industry everyone carries notebooks, taking notes at shows, schedules etc. I myself keep a Stylist Little Black Book with all the contacts I’ve collected in the industry. Any of these would be a great way to use this project!

YOU WILL NEED:
Sheets of Plain Paper
Colored Card Paper
Masking Tape
Glue
Needle and Thread
Ruler and Pencil
Old Magazine clippings

STEP 1:

Cut out two equal sized pieces of the colored card the size you wish your book to be. These will be the front and back cover of the book. 


Next, start sticking your various magazine clippings and arrange them, stick them down (preferably overlapping each other) in an arrangement of your choice. For my ‘Diet’ booklet, I chose clippings which all had a healthy exercise theme to them, so you can them yours anyway you wish.


When both card pieces are covered to satisfaction, seal the clippings onto the cover using strips of masking tape. The ends of the tape should be tucked a good length, an 1’’ each end, on the inside of the cover (don’t worry, they’ll be concealed later!). Now your book is covered.


STEP 2:

Now the pages. Fold several pieces of your page paper (I chose lined paper) then measure out your pages. I made mine slightly smaller than the cover panels. Inside the folds hand stitch about three to four sheets of paper together using a simple hand stitch. Using the prit stick, glue each side of the small booklets together from their outside pages to make 1 large booklet. Finally glue the outside of the pages to the inside of the book cover. 


The contents are now up to you...